![[Previous]](prev.gif) |
![[Contents]](contents.gif) |
![[Index]](keyword_index.gif) |
![[Next]](next.gif) |
![[Previous]](prev.gif) |
![[Contents]](contents.gif) |
![[Index]](keyword_index.gif) |
![[Next]](next.gif) |
In this chapter:
One of the more distinctive tools within the IDE is the QNX System Builder perspective, which simplifies the job of building OS images for your embedded systems. Besides generating images intended for your target board's RAM or flash, the QNX System Builder can also help reduce the size of your images (e.g. by reducing the size of shared libraries). The Builder also takes care of tracking library dependencies for you, prompting you for any missing components.
When you open the QNX System Builder to create a project, you have the option to either import or customize an existing buildfile in order to generate an image, or create one from scratch. The QNX System Builder editor lets you select the components (the binaries, DLLs, and libraries) that you want to incorporate into your system image. As you add a component, the QNX System Builder automatically adds any shared libraries required for runtime loading. For example, if you add the telnet application to a project, the QNX System Builder will automatically include libsocket.so to ensure that telnet can run.
 |
The QNX System Builder won't automatically include the necessary DLLs because they aren't listed in the NEEDED section for a given binary. For more information, see Managing your images |
The QNX System Builder contains a Serial Terminal view for interacting with your board's ROM monitor or QNX Initial Program Loader (IPL) and for transferring images (using the QNX sendnto protocol). The QNX System Builder also has an integrated TFTP Server that lets you transfer your images to network-aware targets that can boot via the TFTP protocol.
When you open the QNX System Builder to create a project, you have the option to either import or customize an existing buildfile in order to generate an image, or create one from scratch. The QNX System Builder editor lets you select the components (the binaries, DLLs, and libraries) that you want to incorporate into your system image. As you add a component, the QNX System Builder automatically adds any shared libraries required for runtime loading. For example, if you add the telnet application to a project, the QNX System Builder will automatically include libsocket.so to ensure that telnet can run.
 |
The QNX System Builder won't automatically include the necessary DLLs because they aren't listed in the NEEDED section for a given binary. For more information, see “Managing your images.” |
Using standard QNX embedding utility (mkifs, mkefs), the QNX System Builder can generate configuration files for this tool that can be used outside of the IDE for scripted/automated system building. As you do a build, a Console view shows the output from the underlying build command. You can use the mksbp utility to build a QNX System Builder project.bld from the command-line; mksbp automatically calls mkifs or mkefs, depending on the kind of image being built to build the image.
Here's what the QNX System Builder perspective looks like:
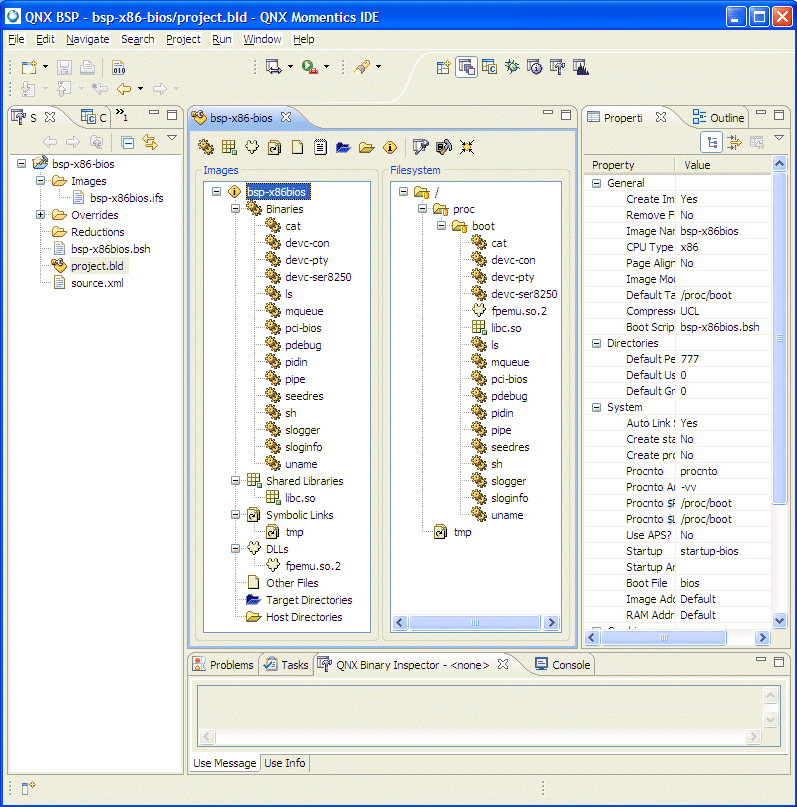
One of the main areas in the QNX System Builder is the editor, which presents two panes side by side:
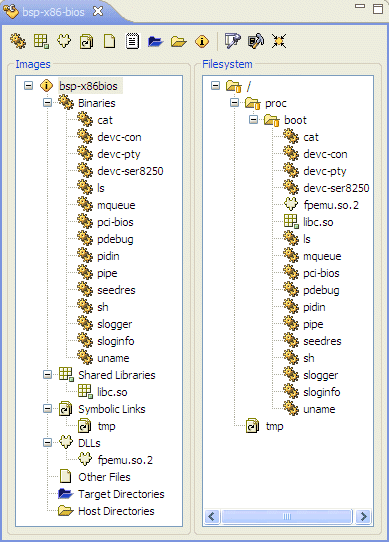
Above the Images and Filesystem panes in the editor you'll find several buttons for working with your image:
Below the Images and Filesystem panes is the QNX Binary Inspector view, which shows the usage message for any binary you select:
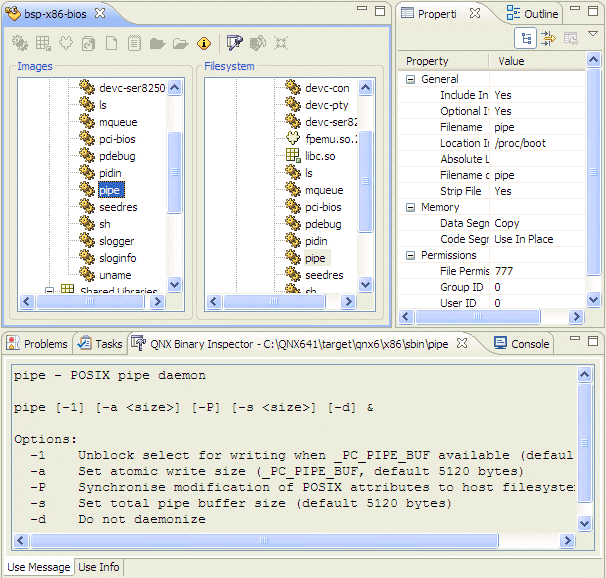
The Binary Inspector also has a Use Info tab that gives the selected binary's name, a brief description, the date it was built, and so on.
All QNX BSPs ship with a buildfile, which is a type of “control” file that gives instructions to the mkifs command-line utility to generate an OS image. The buildfile specifies the particular startup program, environment variables, drivers, etc. to use for creating the image. The boot script portion of a buildfile contains the sequence of commands that the Process Manager executes when your completed image starts up on the target.
 |
For details on the components and grammar of buildfiles, see the section “Configuring an OS image” in the chapter Making an OS Image in Building Embedded Systems, as well as the entry for mkifs in the Utilities Reference. |
The QNX System Builder perspective provides a convenient graphical alternative to the text-based buildfile method. While it hides most of the “gruesome” details from you, the QNX System Builder perspective also lets you see and work with things such as boot scripts.
The QNX System Builder perspective stores the boot script for your project in a .bsh file. If you double-click a .bsh file in the Navigator or System Builder Projects view, you'll see its contents in the editor.
Like other tools within the IDE, the QNX System Builder perspective is project-oriented — it organizes your resources into a project of related items. Whenever you create a project in the QNX System Builder perspective, you'll see a project.bld file in the Navigator or System Builder Projects view.
The project.bld file drives the System Builder editor; if you select the project.bld, you'll see your project's components in the Images and Filesystem panes, where you can add and remove items for the image you'll be building.
 |
As with most other tools in the IDE, you build your QNX System Builder projects using the standard Eclipse build mechanism via . |
You can use the QNX System Builder throughout your product-development cycle:
 |
For details on importing a BSP, see the section “Importing a BSP or other QNX source packages” in the chapter Managing Source Code in this guide. |
Before you use the QNX System Builder to create OS and flash images for your hardware, let's briefly describe the concepts involved in building images so you can better understand the QNX System Builder in context.
This section covers the following topics:
Neutrino supports a wide variety of CPUs and hardware configurations. Some boards require more effort than others to embed the OS. For example, x86-based machines usually have a BIOS, which greatly simplifies your job, while other platforms require that you create a complete IPL. Embedded systems can range from a tiny memory-constrained handheld computer that boots from flash, to an industrial robot that boots through a network, to a multicore system with lots of memory that boots from a hard disk.
Whatever your particular platform or configuration, the QNX System Builder helps simplify the process of building images and transferring them from your host to your target.
The goal of the boot process is to get the system into a state that lets your program run. Initially, the system might not recognize disks, memory, or other hardware, so each section of code needs to perform whatever setup is needed in order to run the subsequent section:

Typical boot order.
At reset, a typical processor has only a minimal configuration that lets code be executed from a known linearly addressable device (e.g. flash, ROM). When your system first powers on, it automatically runs the IPL code at a specific address called the reset vector.
When the IPL loads, the system memory usually isn't fully accessible. It's up to the IPL to configure the memory controller, but the method depends on the hardware — some boards need more initialization than others.
When the memory is accessible, the IPL scans the flash memory for the image filesystem, which contains the startup code (described in the next section). The IPL loads the startup header and startup code into RAM, and then jumps to the startup code.
The IPL is usually board-specific (it contains some assembly code) and is as small as possible.
The startup code initializes the hardware by setting up interrupt controllers, cache controllers, and base timers. The code detects system resources such as the processor(s), and puts information about these resources into a centrally accessible area called the system page. The code can also copy and decompress the image filesystem components, if necessary. Finally, the startup code passes control, in virtual memory mode, to the procnto module.
The startup code is board-specific and is generally much larger than the IPL. Although a larger procnto module could do the setup, we separate the startup code so that procnto can be board-independent. Once the startup code sets up the hardware, the system can reuse a part of the memory used by startup because the code won't be needed again.
 |
If you're creating your own startup variant, its name must start with startup or the QNX System Builder perspective won't recognize it. |
The procnto module is the core runtime component of the QNX Neutrino OS. It consists of the microkernel, the process manager, and some initialization code that sets up the microkernel and creates the process-manager threads. The procnto module is a required component of all bootable images.
The process manager handles (among other things) processes, memory, and the image filesystem. The process manager lets other processes see the image filesystem's contents. Once the procnto module is running, the operating system is essentially up and running. One of the process manager's threads runs the boot script.
Several variants of procnto are available (e.g. procnto-400 for PowerPC 400 series, procnto-smp for x86 multicore machines, etc.).
 |
If you're creating your own procnto variant, its name must start with procnto- or the QNX System Builder perspective won't recognize it. |
For more information, see the System Architecture Guide, as well as procnto in the Utilities Reference
If you want your system to load any drivers or to run your program automatically after powering up, you should run those utilities and programs from the boot script. For example, you might have the boot script:
# Create an adaptive partition using the thread scheduler
# named "Wickedeo" with a budget
# of 20%:
sched_aps Wickedeo 20

# Start qconn in the Debugging partition:
[sched_aps=Debugging]/usr/sbin/qconn

# Use the recommended security level for the partitions:
ap modify -s recommended
For more information about these commands, see the Adaptive Partitioning User's Guide.
When you build your image, the boot script is converted from text to a tokenized form and saved as /proc/boot/.script. The process manager runs this tokenized script.
The IDE lets you create the following images:
If you plan on debugging applications on the target, you must include pdebug in /usr/bin. If the target has no other forms of storage, include it in the OS image or flash image.
In our BSP docs, buildfiles, and scripts, we use a certain filename convention that relies on a name's prefixes and suffixes to distinguish types:
| Part of filename | Description | Example |
|---|---|---|
| .bin | Suffix for binary format file | ifs-artesyn.bin |
| .build | Suffix for buildfile | sandpoint.build |
| efs- | Prefix for QNX Embedded Filesystem file; generated by mkefs | efs-sengine.srec |
| .elf | Suffix for ELF (Executable and Linking Format) file | ipl-ifs-mbx800.elf |
| ifs- | Prefix for QNX Image Filesystem file; generated by mkifs | ifs-800fads.elf |
| ipl- | Prefix for IPL (Initial Program Loader) file | ipl-eagle.srec |
| .openbios | Suffix for OpenBIOS format file | ifs-walnut.openbios |
| .prepboot | Suffix for Motorola PRePboot format file | ifs-prpmc800.prepboot |
| .srec | Suffix for S-record format file | ifs-malta.srec |
 |
The QNX System Builder uses a somewhat simplified convention.
Only a file's three-letter extension, not its
prefix or any other part of the name, determines how the
QNX System Builder should handle the file.
For example, an OS image file is always an .ifs file in the QNX System Builder, regardless of its format (ELF, binary, SREC, etc.). To determine a file's format in the IDE, you'll need to view the file in an editor. |
The OS image is a bootable image filesystem that contains the startup header, startup code, procnto, your boot script, and any drivers needed to minimally configure the operating system:
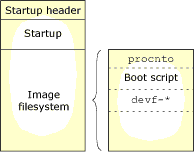
Generally, we recommend that you keep your OS image as small as possible to realize the following benefits:
If your embedded system has a hard drive or CompactFlash (which behaves like an IDE hard drive), you can access the data on it by including a block-oriented filesystem driver (e.g. devb-eide) in your OS image filesystem and calling the driver from your boot script. For details on the driver, see devb-eide in the Utilities Reference.
If your system has an onboard flash device, you can use it to store your OS image and even boot the system directly from flash (if your board allows this — check your hardware documentation). Note that an OS image is read-only; if you want to use the flash for read/write storage, you'll need to import create a flash filesystem image (.efs file).
Flash filesystem images are useful for storing your programs, extra data, and any other utilities (e.g. qconn, ls, dumper, and pidin) that you want to access on your embedded system.
If your system has a flash filesystem image, you should include a devf* driver in your OS image and start the driver in your boot script. While you can mount an image filesystem only at /, you can specify your own mountpoint (e.g. /myFlashStuff) when you set up your .efs image in the IDE. The system recognizes both the .ifs and .efs filesystems simultaneously because the process manager transparently overlays them. To learn more about filesystems, see the Filesystems chapter in the QNX Neutrino System Architecture guide.
For convenience, the IDE can join together any combination of your IPL, OS image, and .efs files into a single, larger image that you can transfer to your target:
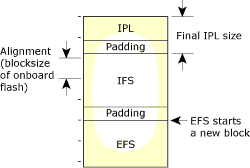
When you create a combined image, you specify the IPL's path and filename on your host machine. You can either select a precompiled IPL from an existing BSP, or compile your own IPL from your own assembler and C source.
 |
The QNX System Builder expects the source IPL to be in ELF format. |
Padding separates the IPL, .ifs, and .efs files in the combined image.
The IPL can scan the entire combined image for the presence of the startup header, but this slows the boot process. Instead, you can have the IPL scan through a range of only two addresses and place the startup header at the first address.
Specifying a final IPL size that's larger than the actual IPL lets you modify the IPL (and change its length) without having to modify the scanning addresses with each change. This way, the starting address of the OS image is independent of the IPL size.
 |
You must specify a padding size greater than the total size of the IPL to prevent the rest of the data in the combined image file from partially overwriting your IPL. |
If your combined image includes one or more .efs images, specify an alignment equal to the block size of your system's onboard flash. The optimized design of the flash filesystem driver requires that all .efs images begin at a block boundary. When you build your combined image, the IDE adds padding to align the beginning of the .efs image(s) with the address of the next block boundary.
A single QNX System Builder project can contain your .ifs file and multiple .efs files, as well as your startup code and boot script. You can import the IPL from another location or you can store it inside the project directory.
By default, your QNX System Builder project includes the following parts:
| Item | Description |
|---|---|
| Images directory | The images and generated files that the IDE creates when you build your project. |
| Overrides directory | When you build your project, the IDE first looks in this directory for a directory matching the image being built. Any files in that directory are used to satisfy the build requirements before searching the standard locations. You can use the Overrides/image_name directory to easily test a change to your build. The image_name subdirectory is created automatically, and you must populate it with the override files your image needs. |
| Reductions directory | The IDE lets you reduce your image size by eliminating unused libraries, and shrinking the remaining libraries. The IDE stores the reduced libraries in the Reductions/image_name directory (where image_name is the name of the image being built). |
| .project file | Information about the project, such as its name and type. All IDE projects have a .project file. |
| .sysbldr_meta file | Information about the properties specific to a QNX System Builder project. This file describes where the IDE looks for files (including the Overrides and Reductions directories), the location of your IPL file, how the IDE includes .efs files, and the final format of your .ifs file. |
| project.bld file | Information about the structure and contents of your .ifs and .efs files. This file also contains your boot script file. |
| .bsh file | Contains the boot script for your project. |
Here are the main steps involved in using the IDE to get Neutrino up and running on your board:
 |
To create an EFS project, you'll need to follow the Workaround instructions found in “Creating a project for an OS image,” below. |
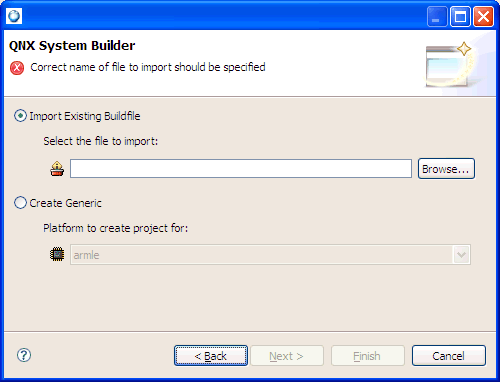
To create a new QNX System Builder Project:
 |
We recommend that you select Import Existing Buildfile, rather than a generic option. Creating a buildfile requires a working knowledge of boot script grammar (as described in the entry for mkifs in the Utility Reference and in the Building Embedded Systems manual). |
Click the Browse… button to select an existing buildfile. Refer to your BSP docs for the proper .build file for your board. You can find buildfiles for all the BSPs installed on your system in $QNX_TARGET/processor/boot/build/ on your host.
If you're creating a generic buildfile, select your desired platform from the dropdown list.
 |
Workaround: To create an EFS project:
|
To create a flash filesystem project:
You can also build projects using the context menu:
The System Builder Console view shows the output produced when you build your images:
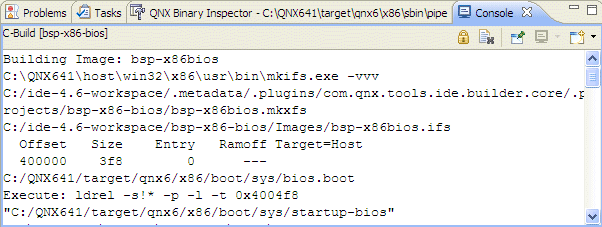
Output can come from any of these utilities:
For more information, see their entries in the Utilities Reference.
You can clear the view by clicking the Clear Output
button (![]() ).
).
You can create a new image for your QNX System Builder
project by using the Add New Image icon
(![]() ) in the
System Builder editor's toolbar:
) in the
System Builder editor's toolbar:
The IDE shows the Create New Image dialog box:
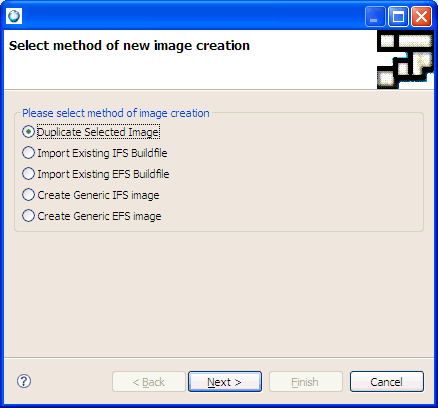
As mentioned earlier, the QNX System Builder lets you create a combined
image. You use the Combine image(s) icon (![]() )
to:
)
to:
To add an IPL to the start of your image:
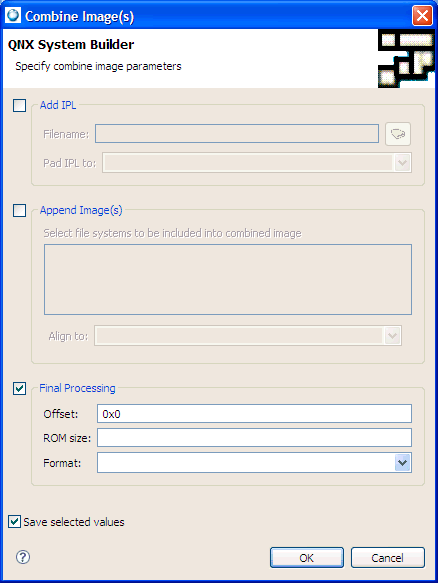
 |
If the padding is less than the size of the IPL, the image won't contain the complete IPL. |
 |
If you get a “File Not Found” error while building, make sure the
Build with profiling option is unchecked in all of the C/C++
projects in the BSP working set, and then rebuild all of the projects.
Right-click on a project, then choose Properties and select QNX C/C++ Project to view the Build with profiling setting. |
To append a flash filesystem to your image:
You'll use the Final Processing section of the Create New Image dialog to set the final format for your image:
For more information of the final processing of an OS image, see mkrec in the Utilities Reference.
Many boards have a ROM monitor, a simple program that runs when you first power on the board. The ROM monitor lets you communicate with your board via a command-line interface (over a serial or Ethernet link), download images to the board's system memory, burn images into flash, etc.
The QNX System Builder has a TFTP server that you can use to communicate with your board.
 |
If your board doesn't have a ROM monitor, you probably can't use the download services in the IDE; you'll have to get the image onto the board some other way (e.g. JTAG). To learn how to connect to your particular target, consult your hardware and BSP documentation. |
The QNX System Builder includes a built-in TFTP server, you don't need to leave the IDE and open a serial communications program (e.g. HyperTerminal) in order to talk to your target, download images, etc.
Using the Terminal view, you can:
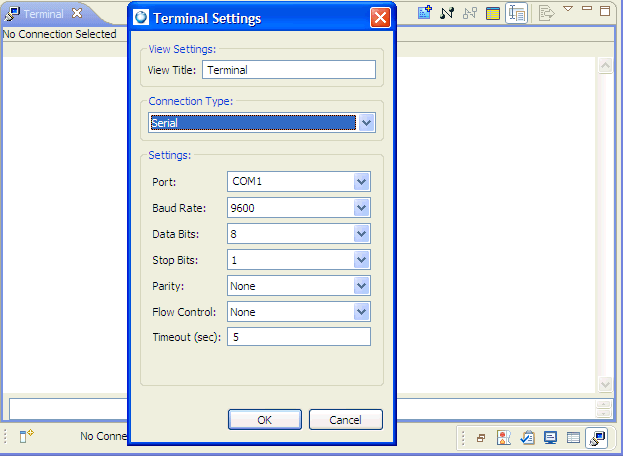
The Terminal view lets you set standard communications parameters (baud rate, parity, data bits, stop bits, and flow control), choose a port (COM1 or COM2), send a BREAK command, and so on.
To communicate with your target over a serial connection:
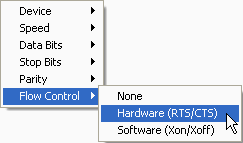
You can now interact with your target by typing in the view.
 |
By default on Linux hosts, the owner (root) and the group (uucp) have read-write permission on all /dev/ttyS* serial devices; users outside this group have no access. If you're logged in as a non-root user, and you aren't a member of the uucp group, then the Terminal view doesn't show any serial devices to select from, since you don't have access rights to any of them. To work around this problem, add non-root users to the uucp group. |
When a connection is made, the Send File button changes
to its enabled state (![]() ), indicating that
you can now transfer files to the target.
), indicating that
you can now transfer files to the target.
To transfer a file using the Terminal view:
 |
The QNX sendnto protocol sends a sequence of records (including the start record, data records, and a go record). Each record has a sequence number and a checksum. Your target must be running an IPL (or other software) that understands this protocol. |
 |
You can click the Cancel button to stop the file transfer:
|
The QNX System Builder's TFTP server eliminates the need to set up an external server for downloading images (if your target device supports TFTP downloads). The TFTP server knows about all QNX System Builder projects in the system and automatically searches them for system images whenever it receives requests for service.
When you first open the TFTP Server view (in any perspective), the QNX System Builder starts its internal TFTP server. For the remainder of the current IDE session, the TFTP server listens for incoming TFTP transfer requests and automatically fulfills them.
The TFTP Server view provides status and feedback for current and past TFTP transfers. As the internal TFTP server handles requests, the view provides visual feedback:

The TFTP Server view shows the current and past TFTP transfers.
Each entry in the view shows:
To transfer a file using the TFTP Server view:
You can clear the TFTP Server view of all completed
transactions by clicking its clear button
(![]() ).
).
 |
The internal TFTP server recognizes files in the Images directory of all open QNX System Builder projects; you don't need to specify the full path. |
 |
The IDE deletes the content of the Images directory during builds — don't use this directory to transfer files that the QNX System Builder didn't generate. Instead, configure a new path, as described in the following procedure. |
To enable the transfer of files that aren't in the Images directory:
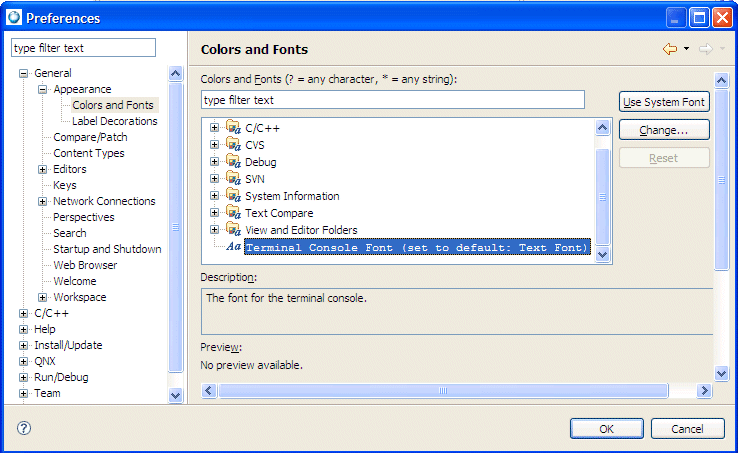
If your board doesn't have an integrated ROM monitor, you may not be able transfer your image over a serial or TFTP connection. You'll have to use some other method instead, such as:
Or:
Or:
For more information, see the documentation that came with your board.
In order to use the QNX System Builder to produce your final embedded system, you'll likely need to:
As mentioned earlier, every QNX System Builder project has a project.bld file that contains information about your image's boot script, all the files in your image, and the properties of those files.
If you double-click the project.bld, you'll see your project's components in the Images and Filesystem panes in the editor area, as well as a Properties view:
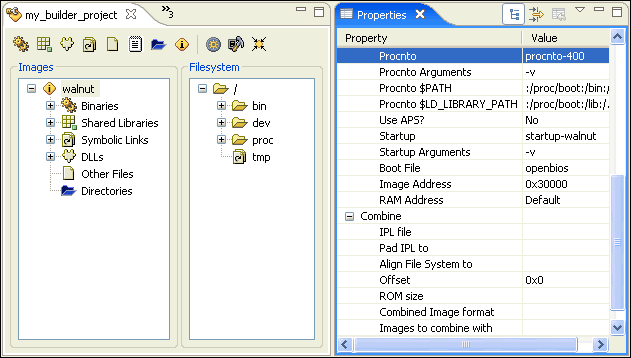
The Images pane shows a tree of all the files in your image, sorted by type:
 |
The System Builder can determine which shared libraries are required since it inspects the NEEDED section for the binaries. Since DLL's don't get listed in the NEEDED section, they're not automatically included. If they exist in the NEEDED section, every DLL would have to be linked into every server (i.e. io-net would have to load every driver at runtime, as well as every protocol stack.) Alternately, you'll have to rebuild everything to specify all of the libraries you're using. Ensure that you include the proper driver; otherwise, you'll have to rebuild. |
To determine which shared libraries are required, you'll need to look at the NEEDED section. For DLL's, see “Optimizing your system.” For the most common cases, use the following:
 |
The QNX System Builder won't automatically include the necessary DLLs as these aren't listed in the NEEDED section for a given binary. |
Finally, you can use the Korn shell, and include DL_DEBUG=1 in your command line to print the list of libraries and DLLs being loaded at program startup. If you don't have a library that's being opened or resolved, you'll receive an error message.
When you add files, you can either browse your host filesystem or select one or more files from a list of search paths:
Note that the IDE saves only the filename. When you build your project, the IDE follows your search paths and uses the first file that matches your specified filename. If you specify a file that isn't in the search path, the build will be incomplete. To learn how to configure your search paths, see the section “Configuring project properties” in this chapter.
To add items to your image:
To add a directory to your image:
 |
You can also add a directory by specifying the path for an item in the Location In Image field in the Properties view. The IDE includes the specified directory as long as the item remains in your image. |
 |
A deleted directory persists if it still contains items. To completely remove the directory, delete the reference to the directory in the Location In Image field in the Properties view for all the items in the directory. |
The Properties view lets you see and edit the properties of an image or any of its items. Note that the properties associated with IFS and EFS images differ slightly. For an IFS image, right-click on the image name and click Show Properties to see these properties:
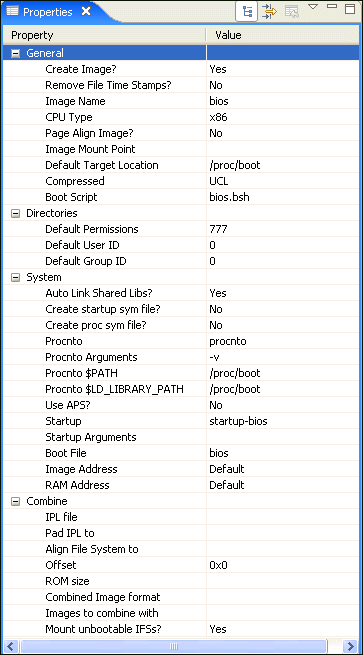
If you right-click on the libc.so item under Shared Libraries, you'll see these properties:
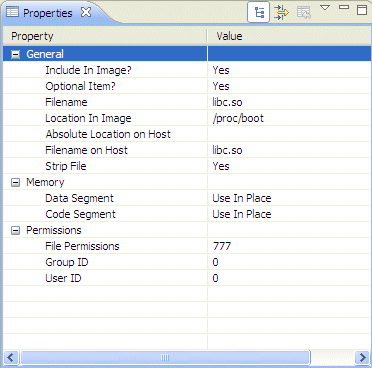
For an EFS image, you'll see these properties:
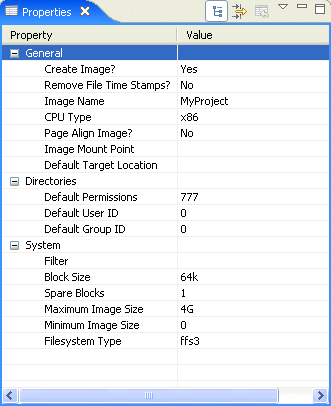
To change the properties of an image or item:
Different properties appear for images and for the items in an image:
These settings control how images are combined with your System Builder project. For example, you can control how the EFS is aligned, what format the resulting image is, the location of the IPL, its image offset, and whether or not the IPL is padded to a certain size or not.
These settings control the default permissions for directories that you add to the image, as well as for any directories that the tools create when you build your system. For example, if you add /usr/bin/ksh to your system, the IDE automatically creates the usr and bin directories. (For more information on permissions, see the Managing User Accounts chapter in the Neutrino User's Guide and the chmod entry in the Utilities Reference.)
Note that the values for permissions are given in octal (e.g. 777, which means the read, write, and execute bits are set for the user, group, and other categories).
To create partitions and run programs in them at boot time, add the appropriate commands to the image's .bsh file. For more information, see “Boot script” earlier in this chapter.
These settings control the format and size of your flash filesystem image. Unless otherwise specified, the values are in bytes, but you can use the suffixes K, M, or G (e.g. 800, 16K, 2M, 4G). The IDE immediately rejects invalid entries.
 |
Symbolic links also have a Linked To field for the source file. A deleted directory persists if it still contains items. To completely remove the directory, delete the reference to the directory in the Location In Image field in the Properties view for all the items in the directory. |
Use these two settings (which apply to .ifs files only) to specify whether a program's code and data segments should be used directly from the image filesystem (Use In Place) or copied when invoked (Copy). For more information, see the code attribute in the mkifs documentation.
Use these settings to specify the read/write/execute permissions (in octal) assigned to each item, as well as the item's group and user IDs.
The Properties dialog for your QNX System Builder project (right-click the project, and then select Properties) lets you view and change the overall properties of your project. For example, you can add dependent projects and configure search paths.
The dialog includes the following sections:
 |
For information on external tools, follow these links in the Eclipse Workbench User Guide: . |
The Search Paths pane lets you configure where the IDE looks for the files you specified in your project.bld file:
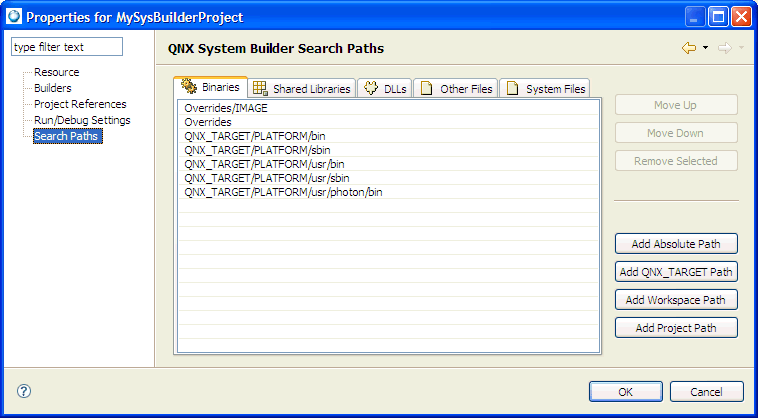
The IDE provides separately configurable search paths for:
To add a search path:
Another dialog appears.
To manage your search paths:
 |
The Overrides/image_name and
Overrides directories must be first ones in the list.
The Reductions/image_name and
Reductions directories, which are
listed in the Shared Libraries tab, must be next
in the list.
Changing the order of the Overrides or Reductions directories may cause unexpected behavior. |
You can use any of the following environment variables in your search paths; these are replaced by their values during processing:
Since “less is better” is the rule of thumb for embedded systems, the QNX System Builder's System Optimizer and the Dietician help you optimize your final system by:
 |
If you reduce a shared library, and your image subsequently
needs to access binaries on a filesystem (disk, network,
etc.) that isn't managed by the QNX System Builder, then the
functions required by those unmanaged binaries may not be
present. This causes those binaries to fail on
execution.
In general, shared-library optimizers such as the Dietician are truly useful only in the case of a finite number of users of the shared libraries, as you would find in a closed system (i.e. a typical embedded system). If you have only a small number of unmanaged binaries, one workaround is to create a dummy flash filesystem image and add to this image the binaries you need to access. This dummy image is built with the rest of the images, but it can be ignored. This technique lets the Dietician be aware of the requirements of your runtime system. |
To optimize all the libraries in an image:
 |
To ensure that your image works and is as efficient as possible, you should select all three options. |
Optimizing a single library doesn't reduce the library as effectively as optimizing all libraries simultaneously, because the System Optimizer accounts for dependencies.
To reduce a library such as libc using the Dietician, you must iteratively optimize each individual library in your project between two and five times (depending on the number of dependency levels).
You can reduce a single library to its optimum size if it has no dependencies.
To optimize a single library in an image:
If after reducing a library, you notice that your resulting image is too “slim,” you can manually remove the reduced library from the Reductions directory, and then rebuild your image using a standard, “full-weight” shared library.
To restore a library to its original state:
The IDE's Target File System Navigator view lets you easily move files between your host and a filesystem residing on your target.
 |
If you haven't yet created a target system, you can do so
right from within the Target File System Navigator view.
|
Note that the Target File System Navigator view isn't part of the default QNX System Builder perspective; you must manually bring the view into your current perspective.
To see the Target File System Navigator view:
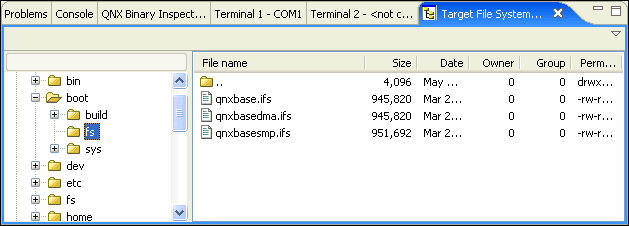
The view shows the target and directory tree in the left pane, and the contents of the selected directory in the right pane:
 |
If the Target File System Navigator view has only one pane, click
the dropdown menu button ( |
You can move files from your host machine to your target using copy-and-paste or drag-and-drop methods.
To copy files from your host filesystem and paste them on your target's filesystem:
 |
To convert files from DOS to Neutrino (or Unix) format, use the textto -l filename command. For more information, see textto in the Utilities Reference. |
To copy files from your target machine and paste them to your host's filesystem:
 |
To import files directly into your workspace, select . The Select Target Folder dialog appears. |
![[Previous]](prev.gif) |
![[Contents]](contents.gif) |
![[Index]](keyword_index.gif) |
![[Next]](next.gif) |